

Data alerting is one of the key capabilities in the Qlik Sense platform which allows you to monitor your business KPIs and proactively drive action with the help of data-driven alerts. If you are using Qlik Sense on Windows, Qlik Alerting is a value add-on product which requires its own license. In addition, the client-managed offering comes as a separate install, primarily to support flexibility in the set up process. However, if you are using Qlik Sense Enterprise SaaS, many of the data alerting capabilities are included in the subscription. This blog post will compare the data alerting capabilities between the two deployment options and show you an example on how you can use data alerts in Qlik Sense SaaS.
Data Alerting in SaaS vs. Windows
Currently for SaaS editions, data alerting is only available in Qlik Sense SaaS Enterprise and not in Qlik Sense Business. For on-premises deployments, the minimum recommended version is Qlik Sense February 2019. Qlik Alerting does not support QlikView.
Overall, both versions are fairly similar in the workflow of creating an alert; you select the app and measure you want to be alerted about, split it by a dimension if required, set conditions for when you should be alerted, and finally choose how and for whom it should be notified.
One of the main differences is how you manage the alerts, where SaaS is more suitable for individual users, whereas Qlik Alerting on Windows is additionally designed to cater for larger user groups in a governed enterprise environment. In SaaS, users can create and manage alerts directly in a chart as they are consuming the apps. In Qlik Sense on Windows, a separate web console is used for creating and managing the alerts. If you want to enable users to create alerts directly in the apps on Windows, it requires an additional extension to be installed.
The difference in managing alerts affects the distribution of the alerts, where Qlik Alerting on Windows offers more options in how you can notify other users, whereas in SaaS you cannot modify how other users receive their notifications. By default in SaaS, you get a web notification, an email and/or a push notification if you are using the mobile version. However, this can be turned off by the individual user in their profile settings. The on-premises version on the other hand offers options to distribute alerts with e-mail templates, sheet links and attached files. Also, the number of recipients in SaaS is limited to 100, whereas there are no fixed limitations in the Windows version.
Lastly, even though this is a blog post about data alerting, it is worth mentioning that Qlik Alerting also offers system alerting on both Windows and SaaS, which checks the status of reload tasks in the QMC and notifies if anything has failed.
Example of data alerting in SaaS
Creating an alert in SaaS is straightforward since you only need to right-click on a visualisation in an app and then select the option ‘Create new alert’. The process of creating an alert consists of three steps described below. In the example, we are creating an alert for when the current year-to-date sales for a product group is dropping more than 20% compared to last year.
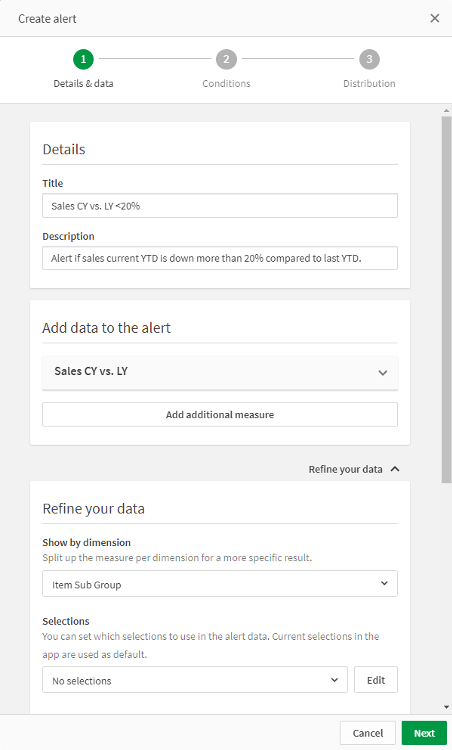
1. Details & Data
After clicking on ‘Create a new alert’, a step-by-step guide is opened. The first step is to enter the title and a description followed by the measure you want to base the alert on. By default, the measures used in the chart you clicked on will show at the top of the list followed by the other master measures saved in the application. You then have the option to refine your measure by splitting it up by a dimension field and/or using a set of selections to narrow it down further.
In this example, we want to drill down to the dimension ‘Item Sub Group’ to alert when any of the product groups drops more than 20% in sales. In the Selections option, you can consider a set of selections made in the app or from a bookmark. In this case, we have disregarded any selections.
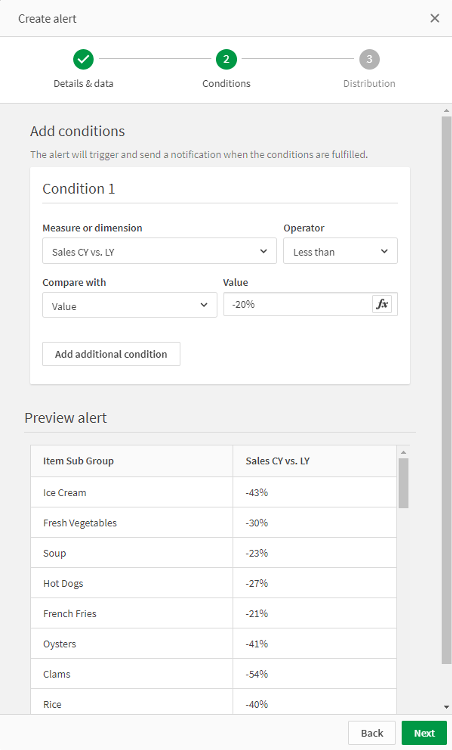
2. Conditions
The second step is to set the conditions. You can compare the measure with either a fixed value or another measure. In this example, the comparison with last year has already been made in the measure, and we simply want to evaluate if the percentage change is less than a negative 20%. Please note that you are provided with a preview where you can check if your condition generates the correct data.
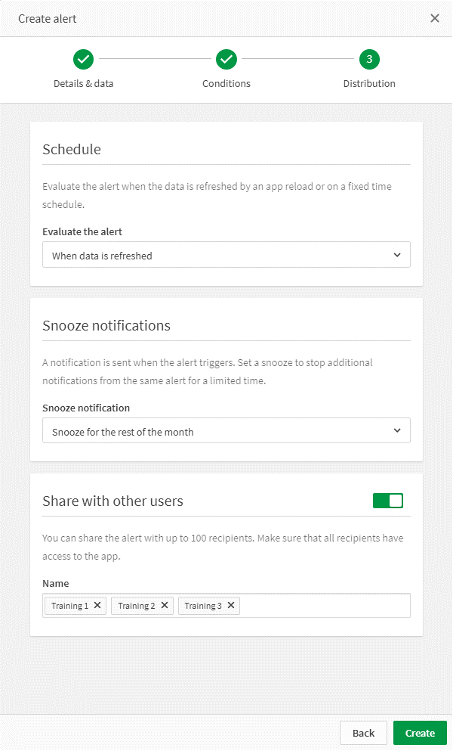
3. Distribution
If the condition looks correct, you can move on to the final step where you select how the alert will be distributed. You have the option to schedule the alert every time the app is reloaded, or on a more fixed time schedule such as a daily, weekly or monthly basis. Furthermore, you can snooze the notification if you don’t want it repeated every time it is encountered. This is a good option to avoid being spammed by the same alert every reload. Finally, you can share the alert with up to 100 recipients. Please note that the recipients needs access to Qlik and the app in question.
Summary
In this blog post we have explored the differences between the client-managed based Qlik Alerting with the cloud-based data alerting capabilities in Qlik Sense Enterprise SaaS. The difference comes down to the governance and distribution of the alerts, which ultimately cater for different needs depending on the size and administration of the environment. We have also looked at creating a data alert in SaaS to give you an example to start off with if you haven’t already tried it yourself.
If you’d like to find out more, check out our recent webinar on data-driven alerts in Qlik Sense Enterprise SaaS.
Topic: Data analytics
.png)
Comments