

Row and column level security in Qlik Data Analytics is commonly referred to as Section Access. Section Access is the process of dynamically reducing the data within a Qlik Sense application. This is accomplished by associating user groups or individual user IDs to data values and/or data attributes.
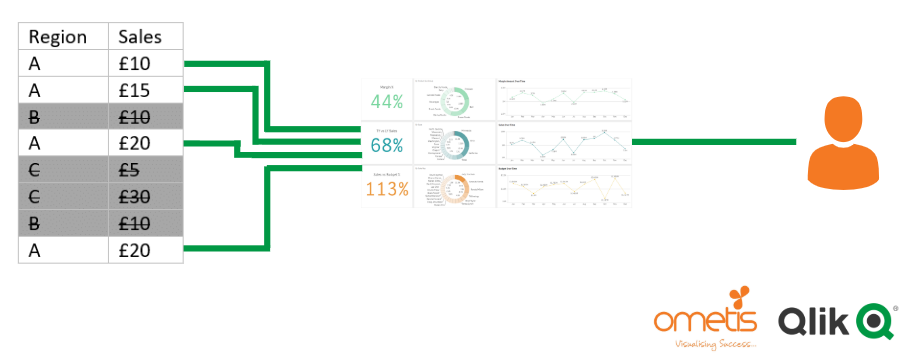
Therefore, it is possible to serve a single Qlik Sense app to multiple users, each with access to differing subsets of the entire data set. For example, let’s use the classic example of a Sales application that needs to be distributed to each of the 3 field salespersons who must only see data for their own region, and to the sales manager who must see the entire data set – all regions. With Section Access applied to an app following these rules and given the simple set of data, shown below, the sales manager will see all sales, totalling £120.
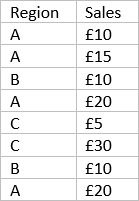
In comparison, each field salesperson will only see the data relating to their region i.e. the salesperson who manages region ‘A’ will only see sales for region ‘A’ on opening the Qlik Sense app, totalling £65 in this example. The data belonging to alternative regions will subsequently be hidden from their opened session of the app:
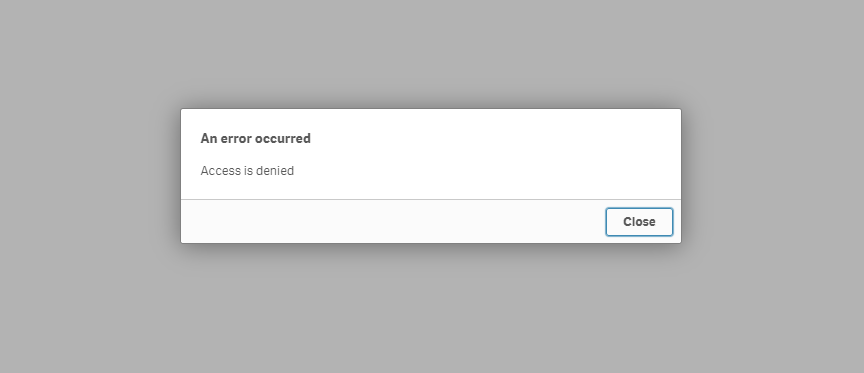
Section Access can also be used to prevent access to an entire application. If you want to share a Qlik Sense app in a stream where only some of the users should be permitted to see the data, you can exclude the other unauthorised users from the Section Access table. They will be greeted with the following message upon opening any unauthorised app:
This can be hugely beneficial in reducing the number of required streams or the need to maintain additional security rules to implement app-level security. Qlik User Security
How to implement Section Access in Qlik Sense?
I’m going to split this into two parts, the first being the Section Access table itself, defining the users/groups and their associated data values and, the second being the Section Application, this is the table that relates the Section Access table to the data model.
Section Access table
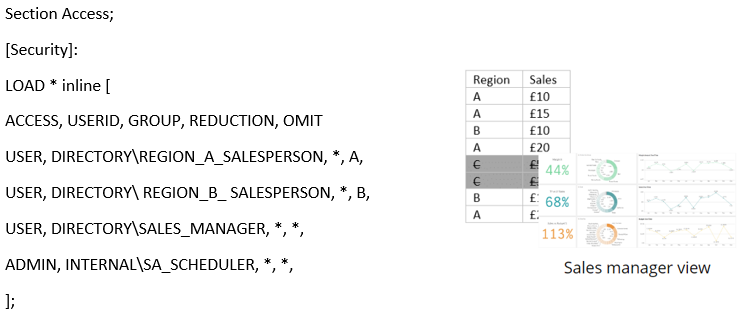
Section Access;
[Security]:
LOAD * inline [
ACCESS, USERID, GROUP, REDUCTION, OMIT
USER, DIRECTORY\REGION_A_SALESPERSON, *, A,
USER, DIRECTORY\ REGION_B_ SALESPERSON, *, B,
USER, *, REGION_C_SALES_GROUP, C, Cost
USER, DIRECTORY\SALES_MANAGER, *, *,
ADMIN, INTERNAL\SA_SCHEDULER, *, *,
];
This is the security table that controls which users have access to the app and which rows/columns they are permitted to see. Section Access should be added at the start of your Qlik Sense load script. Remember, if you implement Section Access and a user is not listed in the security table, they will not be able to open the app. For those that are listed, there are two types of ACCESS: an ‘ADMIN’, who can access all the data, and a ‘USER’ who can only access the data defined for them in the security table.
Next, you need to specify a USERID or GROUP. You don’t need to specify both in the security table, but often I find you will use a mixture. Groups are ideal as they improve the robustness of the security by controlling access through AD groups, but, in some cases it can be impossible to avoid user-level security. When specifying a user you also need to specify the user directory. You can use a wildcard ‘*’ to represent all users or all groups where applicable. When a wildcard is used in a system field (USERID, GROUP or OMIT), it is interpreted as all values, including those not listed in this table. For example, for region ‘C’ in the example above, I have specified that all users (‘*’) belonging to the GROUP ‘REGION_C_SALES_GROUP’ should be able to see region ‘C’.
Note: When using the SaaS version of Qlik Sense, when you will either be using Qlik’s identity provider or an alternative , you can find the user’s domain and ID from the management console > Governance > Events and clicking the drop-down icon on the right of the user name:

Now let’s look at REDUCTION. The REDUCTION field is our chance to assign one or more data values to a user/group. It’s important to note that all field values and field names are converted to upper case by default in the security table. Therefore, it is best practice to write or script them this way to maintain clarity for when you read the script. As seen before, we can use the wildcard ‘*’, but whereas in system fields it means all values, listed or not, in non-system fields such as REDUCTION, it represents all listed values in this field, in this table. Those field values not listed will be reduced regardless of a user or group having a wildcard in the REDUCTION field or not.
Section Access removes unlisted values of non-system fields because Qlik Sense works on a strict exclusion basis, which means all values must appear in the REDUCTION field, within the security table. If for example, we only listed access for two of the regions and used a wildcard for the sales manager to see ‘all data’ (intending it to be three regions), they will only see the data for the two listed regions:
As a result, this may require you to get creative to ensure that all unique values of the REDUCTION field are loaded into the security table against at least one user. For example:
CONCATENATE([User Access])
LOAD
‘ADMIN’ AS ACCESS,
‘INTERNAL\SA_SCHEDULER’ AS USERID,
UPPER(Region) AS REDUCTION,
” AS OMIT
FROM [lib://Data library/Regions.qvd] (qvd);
You may have noticed by now that in all examples we’ve included the service account ‘INTERNAL\SA_SCHEDULER’, including appending all the regional values in the example above. It is necessary to include the service account to enable you to reload the application from the QMC (Qlik Management Console). Also, when ensuring all values exist in the Section Access table, it is also best practice to assign those values against the service account rather than an actual named user.
And, although I’ve focused on assigning security based on one field, you can perform it across several. For this, I’d recommend reading Basics for complex authorisation by Henric Cronström. It was written at the time for QlikView, but the concept still very much applies to Qlik Sense.
You may also come across the need for a user to see multiple values but not all, therefore, you can enter multiple rows for them in the security table, such as:
Section Access;
[Security]:
LOAD * inline [
ACCESS, USERID, GROUP, REDUCTION, OMIT
USER, DIRECTORY\REGION_A_SALESPERSON, *, A,
USER, DIRECTORY\ REGION_B_ SALESPERSON, *, B,
USER, DIRECTORY\ REGION_AB_ SALESPERSON, *, A,
USER, DIRECTORY\ REGION_AB_ SALESPERSON, *, B,
USER, DIRECTORY\SALES_MANAGER, *, *,
ADMIN, INTERNAL\SA_SCHEDULER, *, *,
];
Or for a more efficient approach, you could use SUBFIELD, such as:
Section Access;
[Security]:
LOAD ACCESS, USERID, GROUP, UPPER(SUBFIELD(REDUCTION, ‘;’)) AS REDUCTION, OMIT;
LOAD * inline [
ACCESS, USERID, GROUP, REDUCTION, OMIT
USER, DIRECTORY\REGION_A_SALESPERSON, *, A,
USER, DIRECTORY\ REGION_B_ SALESPERSON, *, B,
USER, DIRECTORY\ REGION_AB_ SALESPERSON, *, A;B,
USER, DIRECTORY\SALES_MANAGER, *, *,
ADMIN, INTERNAL\SA_SCHEDULER, *, *,
];
I’ll take this time to mention the saving grace! Should you find yourself locked out of your own app, you can regain access by navigating to your Work area in the Qlik Sense Hub, right-clicking on the app, followed by ‘Open without data’. It has saved more time for Qlikkies when working with Section Access than you could ever know! I’d also recommend duplicating the app before working with Section Access, at least for more risk adverse developers.
Let’s now move on to the last field in the security table, and not omit talking about OMIT!
OMIT works similarly as REDUCTION, the difference is REDUCTION reduces rows of data and OMIT reduces fields of data. Therefore, the same logic applies, values are converted to upper, and therefore it ignores the case of the field name i.e. Dim1 and DIM1 are treated the same, therefore both would be hidden if it was listed as an OMIT value. If you don’t require the ability to hide fields, simply leave the value blank. In order to hide multiple fields, I’d recommend using the SUBFIELD approach above.
To avoid any nuisances, it is recommended that you do not OMIT any linking fields that could negatively impact your data model and be cautious of omitting fields used in visualisations, as those visualisations will appear with an incomplete error message. To avoid the latter, it is possible to use calculated conditions to prevent your dashboard from experiencing incomplete visualisation errors. Contact me if you wish to discuss how this could be applied to your app.
We’ve now discussed the creation of the security table, let’s look at how we apply it to our data model.
Section Application table
section application;
[Data Reduction]:
LOAD
UPPER(Region) AS REDUCTION,
Region
FROM [lib://Data library/Regions.qvd] (qvd);
The data reduction section should appear immediately beneath the security table. This table relates the security table back to your data model. Treat this table as you would a bridge table. It should contain a field to associate to the security table, REDUCTION, and a field to relate back to one of your tables in your existing data model. In the example above, we use the Region field. Remember the REDUCTION field will still need to be upper-cased to match values in the security table and, if the section application table contains values that do not appear in the Section Access table, they will be reduced.
It can be as simple as that. For more complex implementations, I would recommend reading Henric’s post I mentioned earlier for a start, and contacting us to see how we can help you implement row and column level security in Qlik Sense.
Before you go, it would be prudent of me to mention some limitations of Section Access:
- It is usually quite rare in my experience that users attach files to an application and implement section access to them. However, should you find yourself in this situation, it’s worth being cautious. This is because in the event a user copies the app, the section access is removed and all data in the attached files is therefore exposed.
- Snapshots show data according to the access rights of the user that took it. If the snapshot is shared, all users regardless of permissions will see it as if they were that person that originally took it.
- Section Access does not support Master dimension value colours. Using Master dimension value colours with section access may expose sensitive data, therefore it is best to avoid this feature.
Chris Lofthouse
Key Accounts Director
Qlik Luminary Alumni
Qlik Partner Ambassador
Looking for practical Qlik training tailored to your team's goals? If you and your team want to sharpen your Qlik skills, don't miss our upcoming training sessions.

Topic: Data analytics

Comments