

Qlik recently introduced the Advanced Analytics integration in Qlik Sense SaaS, which allows users to connect to and make advanced calculations in third-party machine learning platforms. One of the Advanced Analytics sources is Amazon Comprehend, which is a managed service for text analysis available to customers on the AWS platform. The Amazon Comprehend connector includes services such as sentiment analysis, entity recognition and personal identifiable information (PII) detection. This blog post will demonstrate a use case where Ometis teamed up with Qlik to develop a solution for one of our clients. Firstly, I want to say many thanks to Steven Pressland at Qlik for making this possible and supporting us along the way.
What is PII analysis and why would we use it?
PII stands for personal identifiable information and refers to any information that can identify an individual, typically personal information such as full name, address or phone number but also information of more sensitive nature such as social security number, bank details or online login credentials. Detecting PII entities and redacting it from the data helps organisations to protect individual privacy and to comply with local laws and regulations, such as GDPR.
Ometis use case for PII analysis
Ometis recently teamed up with Qlik to make PII analysis available in the Amazon Comprehend connector, as this service was not included in the initial release of the Advanced Analytics integration. The case started with a request from a client to mask personal information in their customer support data. The Amazon Comprehend PII detection service made it possible to analyse the customer support feedback in order to detect PII entities and then redact the personal information from the feedback text. The value sort from this use-case was to be able to share, present and make the customer feedback searchable to the wider business. We will now look at how you can use the PII analysis in Qlik Sense SaaS.
Creating a connection to Amazon Comprehend
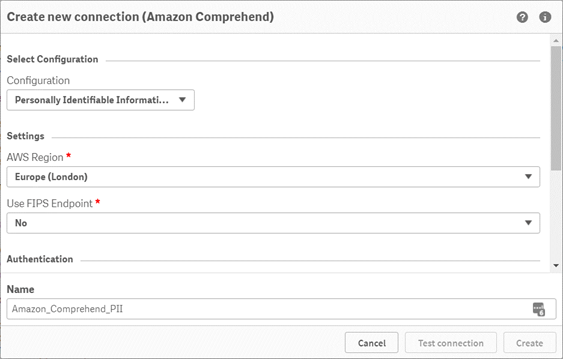
The first step to start using the PII detection is to set up the Advanced Analytics connection. Begin by selecting the Amazon Comprehend connector in the Advanced Analytics list when creating a new data connection. After selecting PII detection as the configuration, you need to select in which region your AWS resources are managed. Next, authenticate yourself using the AWS access key and the AWS secret key, which both can be found in the AWS management console. Finally, you need to add the name of the association field. In other words, a field from the input data source table containing a unique id. If there is no straightforward primary key in the input table, you can create the unique key in the input table by using the RowNo() function. That way, each row that needs to be analysed gets a uniquely numbered association to the resulting table sent back from Amazon Comprehend.
Sending and receiving data using the PII analysis
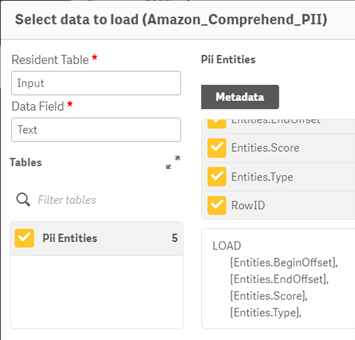
Once the connection has been established, simply use the ‘Select Data’ option from the data connection and enter the name of the table and the name of the data field containing the text to be analysed. This assumes that the data you would like to send for analysis has been inserted in a load statement prior to using the connector. When you have entered the table and data field names in the selection window, a PII entities table will appear. Select the table, insert script and load the data. The result is a table where each detected PII entity is listed by the following fields:
- RowID: the unique row ID created in the input table.
- Entity type: categorisation like name, bank account number, address or email.
- Entity score: a confidence score between 0 and 1, where 1 is an exact match.
- Begin offset: number of characters into the text where the PII entity starts.
- End offset: number of characters into the text where the PII entity ends.
Masking the personal identifiable information
The resulting table returned from Amazon Comprehend only contains information on what entities exist and where they can be located in the input text. To put that information to work and make it useful, we can use the begin and end offsets to locate and replace the PII entities. Because each text value and location of PII entities may be different, we need to loop over each text value and use the begin and end offsets in variables to locate the parts of the text that needs to be masked. Once located, we can use the Replace() function to mask the text with, for example, asterisks (*).
An example of the script syntax, where the input text and the offsets are stated explicitly for the sake of the exercise, could look like this:
![]()
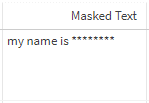
The masked output in this case will look like this:
Limitations
Using the Amazon Comprehend connector assumes you are a customer on Amazon’s cloud platform AWS. If you are not, there are free tier account options which include the Amazon Comprehend service for a limited time and with a limited data capacity. As of this writing, the free tier option includes a monthly data limit of 5 million characters, which roughly corresponds to 50,000 sentences. For example, assuming you have a text field that has an average of 10 sentences per field value, the text analysis will cover 5000 rows of data per month. Regardless of if you are a customer of AWS or not, it is recommended to send and load the data incrementally to avoid sending the same rows of data repeatedly, and to ultimately save cost by sparing the quota. Another limitation is the text size, currently 5000 bytes (UTF-8 characters), which approximately corresponds to 5000 characters per row. A workaround for this limit would be to split the text into more than one row.
Despite the current limitations, this is a much-welcomed feature in Qlik Sense SaaS, along with the other text analyses that Amazon Comprehend has to offer. For more information about the Advanced Analytics sources and how they can benefit your business, get in touch with the Ometis team today.


Comments